Day 2: How to Set Up a Beautiful Website in WordPress
Today, we are going to take the time to get comfortable with WordPress and learn how to set everything up.
Getting Used to WordPress
At first glance, WordPress can be pretty intimidating, but once you get used to it, it’s pretty easy! It definitely helps to know where everything is and how everything works before getting started. With this tutorial, I’ll show you how to set up a basic WordPress blog. To get super fancy, you’ll probably need a drag-and-drop builder like Elementor or Showit. (Or some crazy web design talent.) However, a basic blog will get the job done when you are first starting out or even as your blog grows. For an example of a successful blog with a simple layout, check out Her View From Home.
If you haven’t set up your hosting account in Siteground, be sure to do that first! Sitground has WordPress built-in!
[This article contains affiliate links. If you make a purchase through these links, I may receive a commission.]
Step 1- Pick a Theme for Your Blog
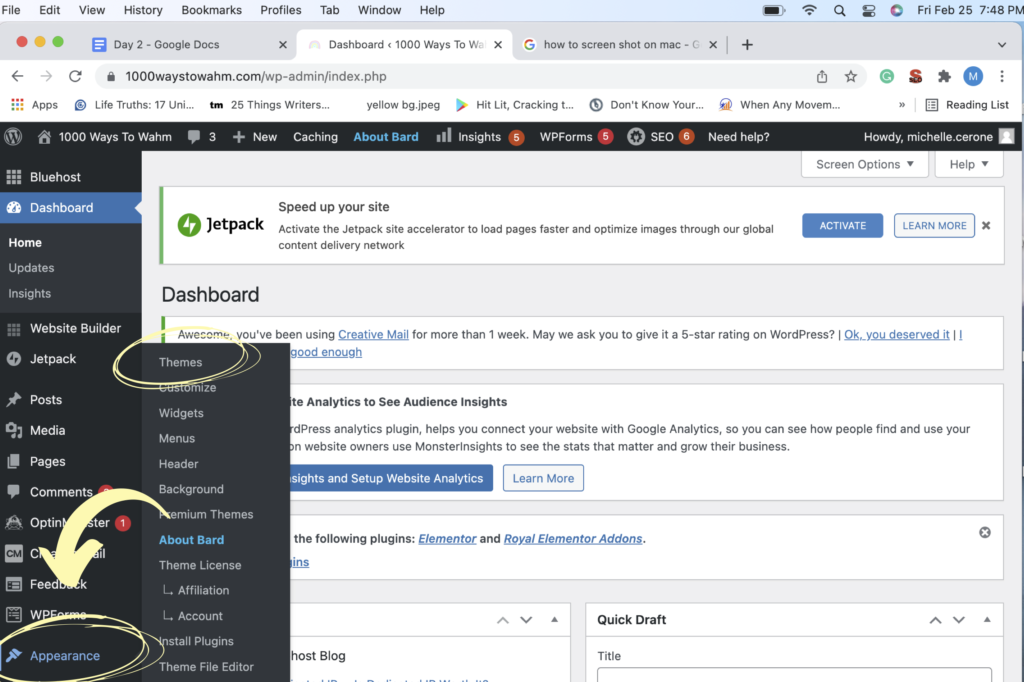
The first thing you will want to do is choose a theme. You can pick a free one or upgrade to a low-cost premium version. To do this, you’ll need to find the “Appearance” tab in the black menu on the left-hand sidebar. If you hover your mouse over it, it will pull up additional options, including “Theme.” Simply click on it and scroll down to where it says “Add Theme,” click and explore all the available themes.
Explore Your Options!
You can demo each theme before installing them, so have fun! I use Bard Pro, which costs about $30, but I also like Edge and Elegant Pink. Bard, Edge, and Elegant Pink all have free and premium versions. Premium versions will give you more options and don’t cost a lot more, so it’s worth considering.
What to Look for in a Theme
I don’t use many of the features of Bard Pro, but they would come in handy for blogs with many high-quality images. If you decide to go with a premium theme, look for one that includes at least one sidebar, an image slider or video, and featured links.
Step 2-Gather Your Images
Before you get started, you’ll want to gather the images that you wish to use on your site. While it is best to use photos you have taken, you can use either Unsplash to access free stock photos or find them in Canva. Here is what you will want to have:
- A header image
- A favicon
- A simple logo
- A nice picture of you for your “About Me” page
- Any images you might want to use in your blog posts
I find that Canva is the best way to manage and design all the images you’ll need, as it has thousands of great templates and images to choose from. There is a free version, but the paid version is less than $15 a month and is one of the only paid services I use. Once you have all the images you are going to use, all you have to do is pop back into the Appearance~> Customize Menu to start adding your images to your website. And that’s all you need to do to set up your site!
Step 3- Explore WordPress
Next, you need to know how to change the appearance of your blog. Here’s what you need to know:
1-Customize Your Blog
To change the appearance of your blog, all you have to do is hover over “Appearance” in the sidebar again and “Customize” to change the appearance. It will bring you to a menu that looks something like this:
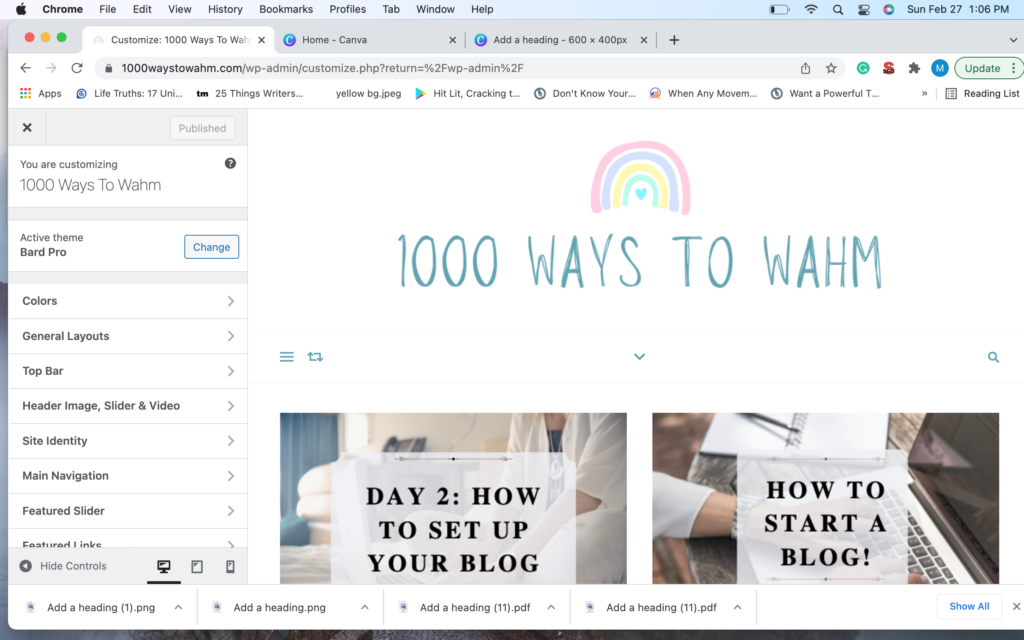
Now, each theme will have different options in this menu, so yours will look different than mine. Your choices will be limited if you are using the free versions, but you will still be able to set up a beautiful blog as long as you have the right images. (See the last step!) Take some time to explore your options and see what each one does.
Site Identity
The “site identity” tab menu is probably one of the most important because it handles some of your SEO, including your title and tagline. It also includes your favicon.
Title and Tagline
Your “Title” and “Tagline” will appear in search engines when someone searches for your blog. It will also appear in your header if you don’t turn it off. To remove your title and site identity from your header, just uncheck the box that says “Display Site Title and Tagline.” You would do this if you have a header image that already has your site name in it.
Favicon
Your favicon is the little image that appears in your search engine tab and is typically your logo or a simplified version of it. (Peep my rainbow!) If you don’t add one, WordPress will add the default “W,” so you will definitely want to add one! You can upload a new favicon in the “site identity” tab.
Typography
Typography is another important section. In the typography section, you can choose the fonts you use in your headers and text.
Main Navigation
“Main Navigation” is where you find the settings for the menu that is at the top of your website. However, you can modify all your menus in the “Menus” tab.
Social Media
This tab lets you add links to your social media accounts and Pinterest. This makes it easy for people to follow you.
2-How to Create a Page or Blog Post
This is just a brief introduction to creating a page or post, but hopefully, it helps you get started. Pages are static pages such as contact pages, about pages, or service pages. Blogs are the articles you write.
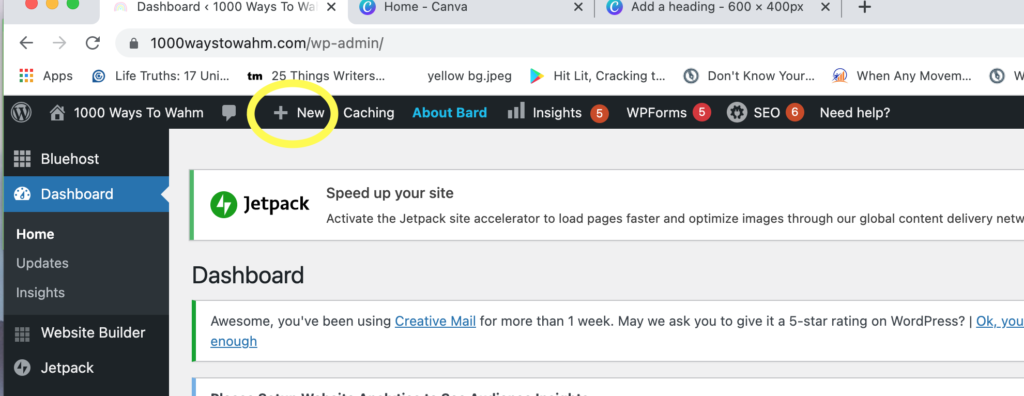
To create a post or page, you can click the + sign in the top bar and choose “Post” or “Page.” This will bring you to WordPress’s editor. There, you can add text, images, and different blocks of content. Take some time to get used to how it works.
3-Launch Your Site
Once you have added any content you already have, you can launch your site. It doesn’t matter if it’s ready or not. No one will find it until you start to promote it, and you can change EVERYTHING at any time. After you launch your site, you will be able to view it anytime by clicking the name of your site next to the little house icon in the top bar.
Now that you know how to set up your blog, it’s time to begin figuring out how to make money with your blog. ! I’ll go over that on Day 3!



One Comment
Pingback: